Savannah Putman Staff Blog
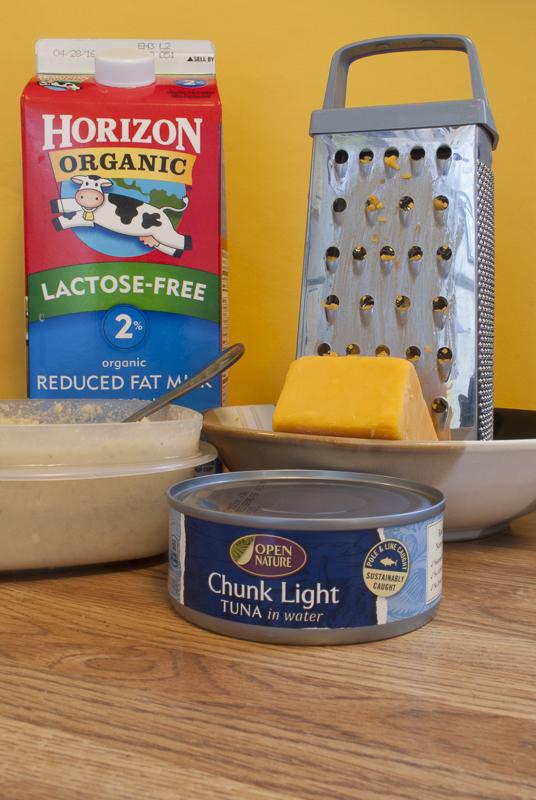
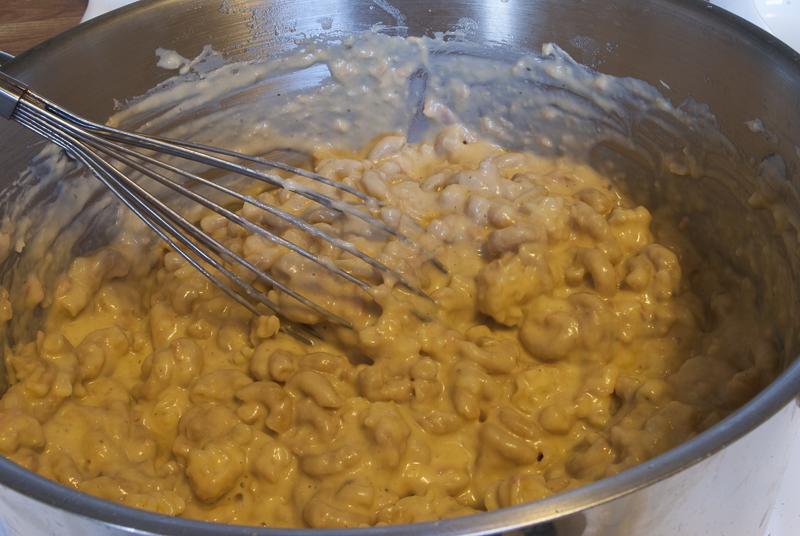
This week, I share my version of grandma's tuna noodle casserole
![]()
Mom’s “World Famous” Tuna Casserole
4 April 2016
This is my daughter’s favorite meal, at least, it’s definitely in her top 5 favorite mom recipes. She joyously described it as “Mom’s world famous tuna casserole” during a sleepover one night, which makes it one of my favorite meals to cook. This recipe has a special bit of nostalgia to me, because it started as a recipe my grandmother gave me over the phone whenever my daughter was about five years old. I really enjoy how quickly it comes together…and how quickly it all disappears!
The original version includes Velveeta-type cheese product and canned cream of mushroom soup, two ingredients that I have completely disregarded from my food budget. [No judgements: you can totally substitute the cheese and cream of mushroom soup for readymade items–just use about half the amount of milk and add more as needed.] My version of cream of mushroom soup can be found on this blog and makes a fantastic addition to any casserole or soup.
Mom’s “World Famous” Tuna Casserole
 INGREDIENTS:
- 1 ½ C shredded cheddar cheese, divided
- 1 C milk
- 10 oz cream of mushroom soup
- 2 Tbsp butter
- 2 Tbsp flour
- 1 small can tuna fish
- 6-8 oz macaroni pasta, cooked & drained
- ¼ C seasoned dry bread crumbs
- Salt, pepper and garlic, to taste
DIRECTIONS:
Step 1: Preheat oven to 375
Step 2: In a heavy-bottomed pot over a medium heat: melt the butter and slowly whisk in the flour, creating a roux. Slowly add the milk and whisk until fully incorporated
Step 3: Add the shredded cheese, cream of mushroom soup and tuna fish, mix well; turn the heat down to low
Step 4: Stir in the cooked pasta and season to taste
Step 5: Transfer the casserole to an 8×8 casserole dish and top with the remaining ½ cup shredded cheese and breadcrumbs
Step 6: Bake @ 375 for 30-45 minutes, until hot and bubbly
Serve & enjoy!
![]()
Slow Cooker Pork Loin Recipe with BONUS Homemade BBQ Sauce
28 March 2016
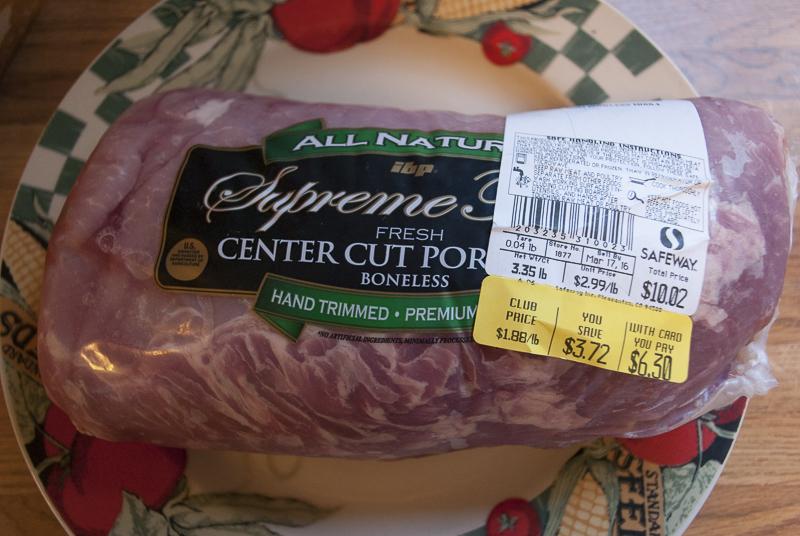 This week, I explain how to make a moist pulled pork and share my homemade BBQ sauce recipe!
I have fallen out of the habit of buying pork chops because I have found that a pork loin will provide more meals for a similar price as buying a pack of pork chops. Whole pork loins can often be found on sale for a great deal, such as this one I plan on cooking today. Normally, I would cut half of this down into pork chops and leave the rest for a BBQ pork loin. Today, I have a family get-together that requires me to bring a dish that will feed more than a dozen hungry bellies and I plan on cooking the whole pork loin down into shredded BBQ meat.
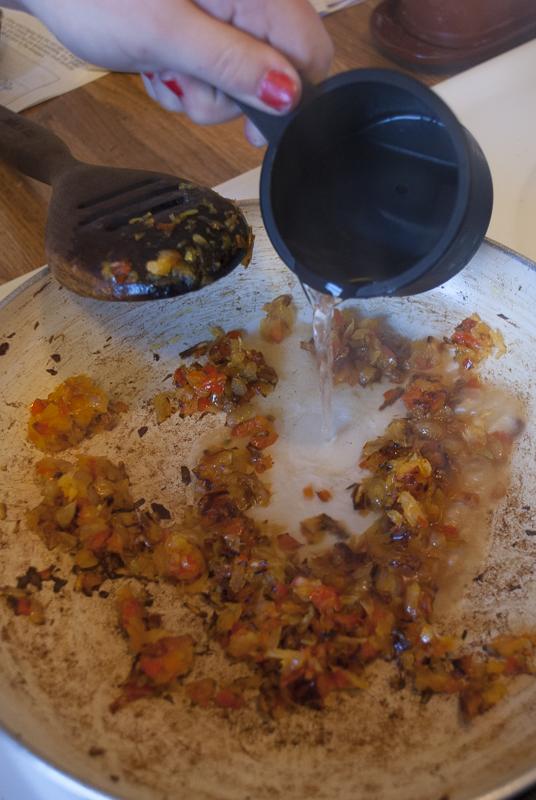
Last night I made a barbecue sauce and prepared the marinade/cooking liquid for my pork loin. It is always best to make BBQ sauce ahead of time and allow the flavors to mix overnight before serving. Otherwise, you run the risk of a vinegary tasting sauce.
I like to prepare my crockpot meals the night before, so I have less work to do in the morning before school. I leave it overnight in the refrigerator and then, I just turn the slow cooker up to high while I cook breakfast and turn it down to low on my way out the door. When I return home, dinner is all but ready to eat.
The best way to pack favor in your pork loin is to include sautéed vegetables and use a mixture of water and broth in the cooking liquid. Coat the meat with olive oil and crushed garlic cloves and a mixture of salt, pepper and sage. Make sure the liquid covers most of the pork loin and cook on low for 6 – 8 hours, until the meat easily shreds with a fork.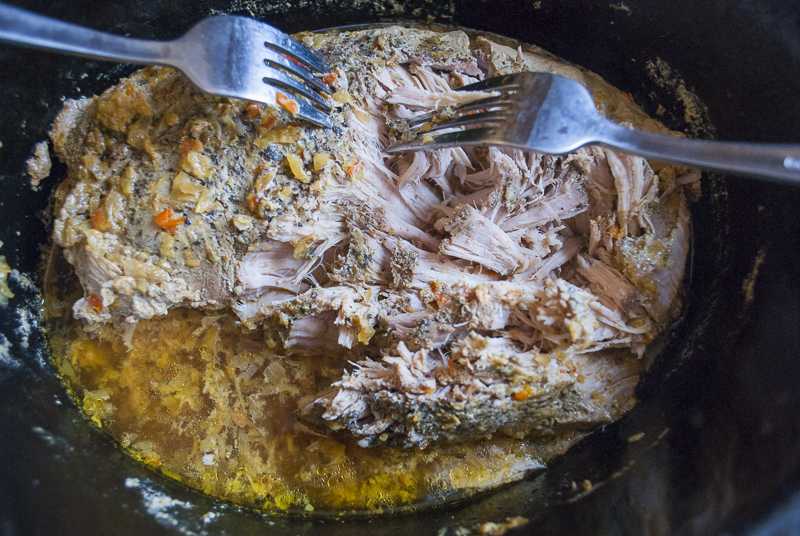
For moist shredded pork that has a flavor other than dry meat and barbecue sauce, the secret is in the broth: do NOT pour it all down the drain when the meat is ready to shred. If there is any fat, carefully strain that out of the liquid. Next, pour some of the broth into a plastic container; about a cup of liquid will be plenty. Remove all but a cup of liquid from the crock and shred the meat with two forks. The meat will soak up the liquid and you may need to add more cooking liquid to the crock as you shred the pork loin. You want to keep enough liquid in the meat so it will not dry out, but not so much that it is runny or saucy.
 After the meat is shredded, it is ready to serve! You can either add your homemade barbecue sauce to it now, and mix it into the meat, or you can serve it with sauce on the side. Either way, it is a crowd pleasing dish.
Quick BBQ Sauce: simple household items, no funky stuff
 INGREDIENTS:
- 1 C. ketchup
- 1 C. water
- ¼ C. worcestershire sauce
- 2 Tbsp. white wine vinegar
- 2 Tbsp. brown mustard
- ¼ C. brown sugar
- ½ tsp. celery salt
- ½ tsp. hot pepper sauce (more, if you like a spicy BBQ, or add ½ tsp. red pepper flakes)
- ½ tsp. garlic powder
- ½ tsp. black pepper
DIRECTIONS:
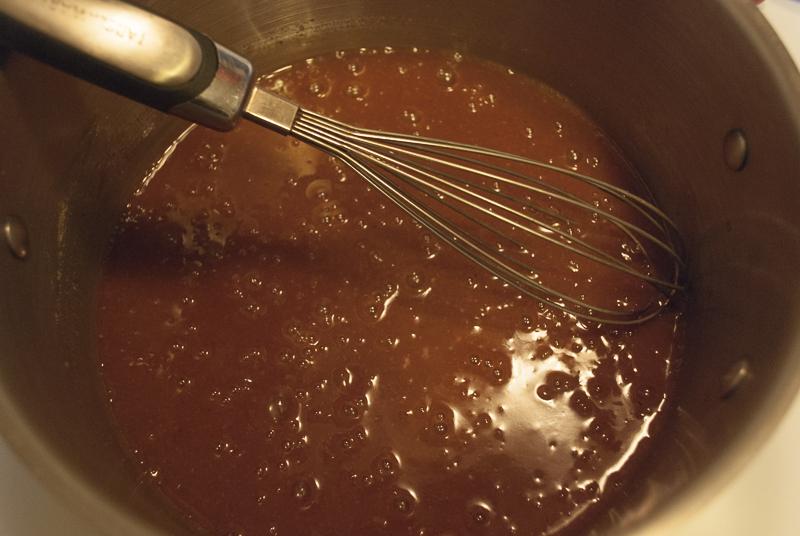
Step 1: In a small cup, mix the brown sugar and worcestershire sauce until fully incorporated.
Step 2: Whisk together all the ingredients in a heavy bottom sauce pot, over a medium heat, and bring to a boil.
Step 3: Turn sauce down to low and allow to simmer for 15 minutes, stirring occasionally.
Step 4: Remove from heat and allow the sauce to cool completely before transferring to a glass container with an airtight lid. Make sure to use a spatula to scrape the remaining sauce from the pot.
Step 5: Store overnight in the refrigerator before serving. This sauce will keep for a few weeks.
![]()
Zesty Italian Seasoning and Dressing
21 March 2016
This week’s blog post is a double whammy: my very own italian seasoning blend and italian dressing tutorial. Lucky you!
[If you already use a pre-made Italian seasoning mix, you can skip ahead to the dressing instructions.]
Still reading? Good.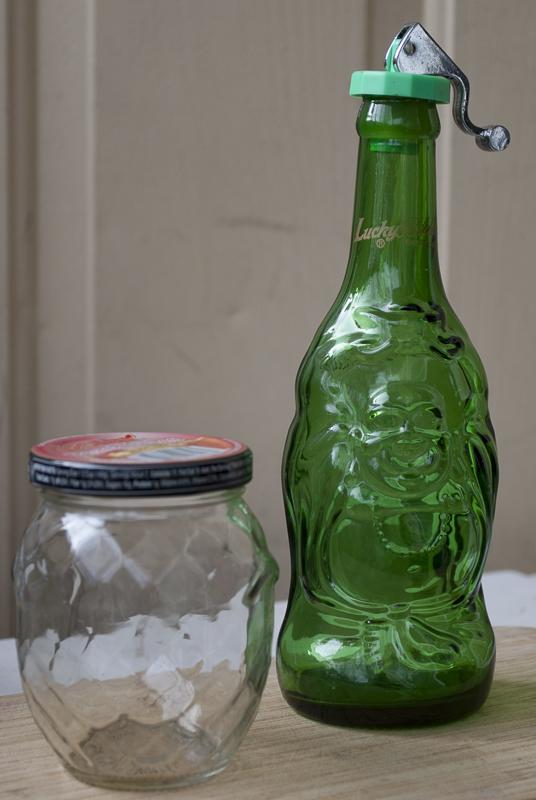
Creating custom herb and spice blends is really a simple task. There are several infographics on Pinterest that illustrate how to create various regional blends to include in your culinary endeavors. Similar infographics break down the basics to creating your very own salad dressing recipes.
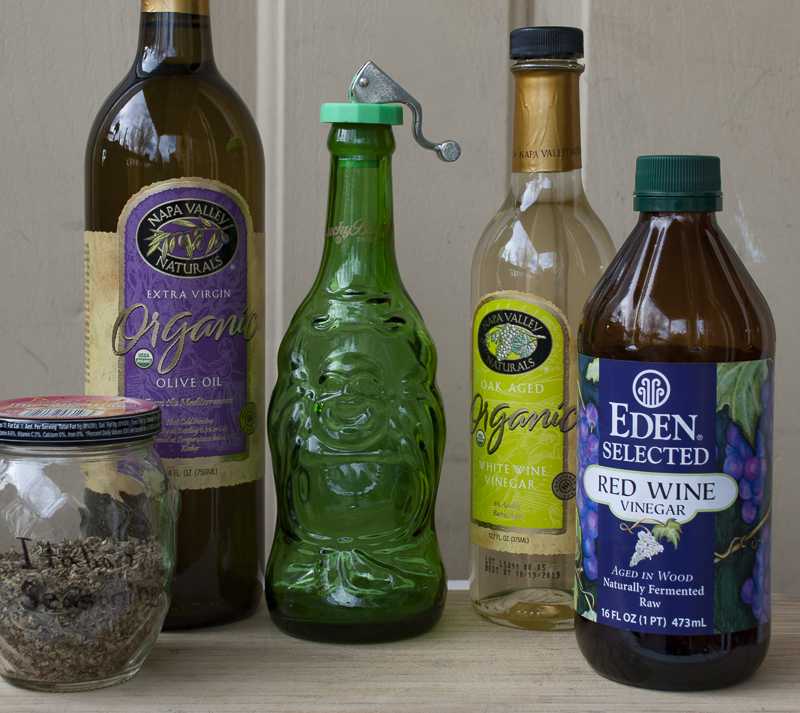
Before you begin, you will need two jars: one suitable for dry seasonings and one better suited for liquid. I recommend a wide mouth jar for your seasonings, if you have one available. Also, keep in mind that you’ll most likely want to pour your salad dressing, and choose an appropriate bottle for the task.
Zesty Italian Seasoning Mix
 INGREDIENTS:
- 2 Tbsp Basil
- 2 Tbsp Oregano
- 2 Tbsp Marjoram
- 1 Tbsp Thyme
- 1 Tbsp Rosemary
- ½ Tbsp Onion flakes
- ½ Tbsp Sage
- ½ Tbsp Garlic powder
- ½ Tbsp Celery salt
DIRECTIONS:
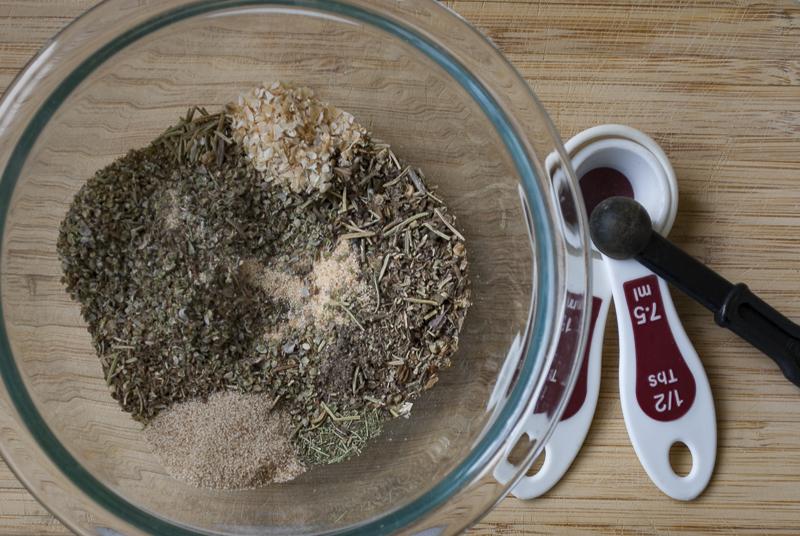
Step 1: In a glass bowl, carefully measure each of the dry ingredients
Step 2: Using a fork or whisk, blend the ingredients. You’ll want to spend a few minutes doing this because the sage and garlic powder will clump together.
Step 3: Once the seasonings take on a consistent appearance, transfer them to an airtight container. Make sure to label it as “Italian Seasoning” and store in a cool, dark place for up to one year.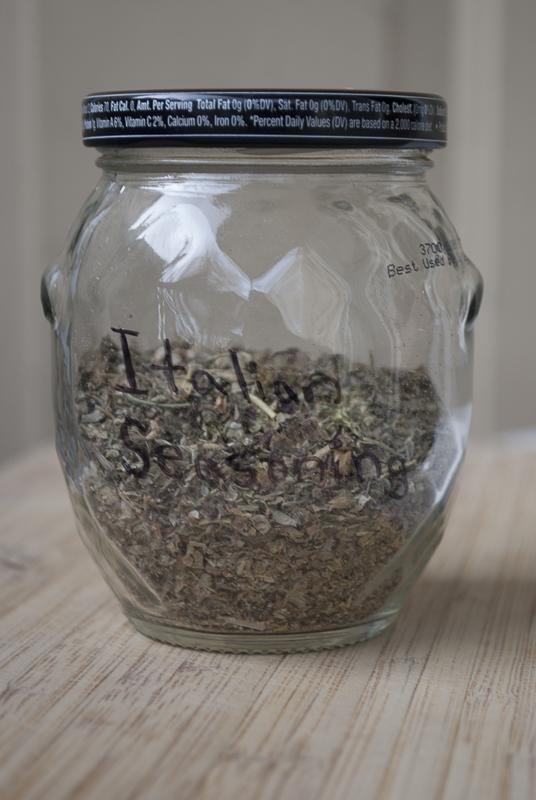
A small tip: never place your dried herbs in the freezer, it will not extend your shelf life and it can change the flavor of certain herbs. A dark cupboard or drawer, away from the heat of the oven, is the best place to store your herbs and spices.
Zesty Italian Dressing
 INGREDIENTS:
- 1 C Extra virgin olive oil
- ⅓ C Red wine vinegar
- ⅓ C White wine vinegar
- 2 Tbsp Italian seasoning
- 1 tsp sugar or honey
- ½ tsp salt
- ½ tsp ground black pepper
- 3 Tbsp Water
DIRECTIONS:
Step 1: If you are absolutely sure that everything will fit into your container, you can skip this part and mix everything in your jar. Otherwise, add each ingredient to a glass bowl and whisk for two minutes, making sure to scrape along the sides and bottom occasionally to incorporate everything.
Step 2: Carefully pour the dressing into your jar (a funnel is a handy kitchen tool) and seal. Store in the refrigerator for up to six weeks. Shake well before each use.
This dressing is good on salads but I think it also makes a fantastic marinade for chicken. Italian dressing is the only thing I put in my green beans while they are cooking–my picky eater loves them.
And there you have it. Two great recipes to add to your arsenal that are free from unpronounceable ingredients, chemicals or any other funky stuff you might not want to eat.
I really enjoy the versatility of both of these recipes. This seasoning and dressing have many different applications, from garlic bread to pizza sauce to marinade, and I hope you find as many uses for them as I have.
![]()
Savannah’s Spinach and Artichoke Dip
14 March 2016
Whenever I get invited to a party or a get together, I like to bring something that seems like it took a lot of time and effort–but really didn’t. To me, a good party dish has to meet a certain criteria: it mustn’t be stressful, it must be easy to serve/eat, and it has to be cooked in the crockpot or easily kept cold.
During the preparations for the most recent family gathering, I happened to be on a tight budget, and feeling indulgent, so I decided to whip up some spinach and artichoke dip for the party.
This week’s recipe is arguably not healthy–but it’s Spring Break and we deserve a special treat for all the hard work we have put in this semester.
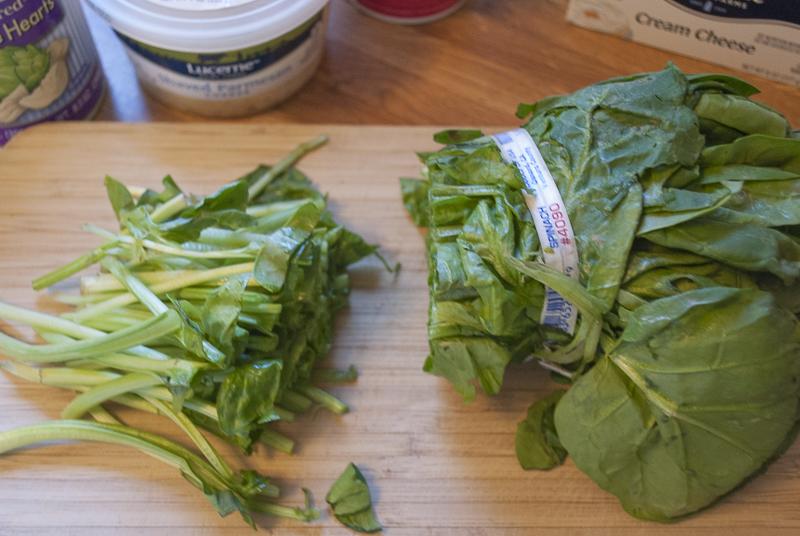
Spinach and artichoke dip seems fancy and tedious, but it is really simple. The food processor chops the spinach with ease–a task easily accomplished with a sharp knife, as well. The star gadget in this recipe is a small crockpot. It would be possible to modify the cook times for the stovetop, but you would want to pay a lot more attention to the dip while it is cooking.
This recipe can be made with fresh or frozen spinach, and any leftover fresh spinach can be frozen for later use.
Savannah’s Spinach and Artichoke Dip
INGREDIENTS:
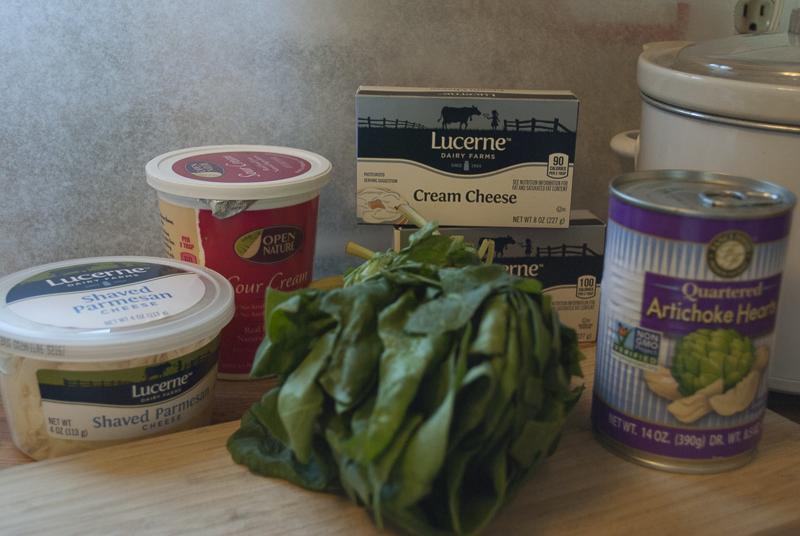
- 1 – 14 oz can artichoke heart
- 2 C. chopped spinach
- 12 oz cream cheese
- 1 C. sour cream
- ¼ C. mayonnaise
- 2 Tbsp shaved parmesan
- 1 Tbsp garlic
- Salt & pepper to taste
DIRECTIONS:
Step 1: If using fresh spinach: remove the stems from the leaves. I use a salad spinner to rinse the leaves to remove any dirt that may remain, the same effect can be achieved with a colander and a large pot.
Step 2: Meanwhile, add the cream cheese and half the sour cream to the crockpot and set to high. As the cheese begins to melt, add the rest of the sour cream and all of the mayonnaise and stir.
Step 3: Using a food processor, pulse the spinach leaves in small batches and add to the crockpot.
Step 4: As the cheese melts, mix everything together and add the garlic and parmesan. Stir well and set the crockpot to low. Allow to cook for 2 hours, or until party time.
Serve with celery and carrot sticks, pretzels or bread.
![]()
All Day Versatile Red Sauce
7 March 2016
When I started my transition to an organic diet, one of the first things I noticed was how expensive prepared organic grocery items are compared to their conventional counterparts. Creating homemade versions of the ready-made items I tended to purchase the most was my way to try to keep the grocery bill within my budget.
Making a spaghetti sauce from scratch seems daunting, but it is so simple–the sauce literally makes itself. A food processor makes quick work of the actual, well, work. The magic happens as the sauce simmers all day on the stove.
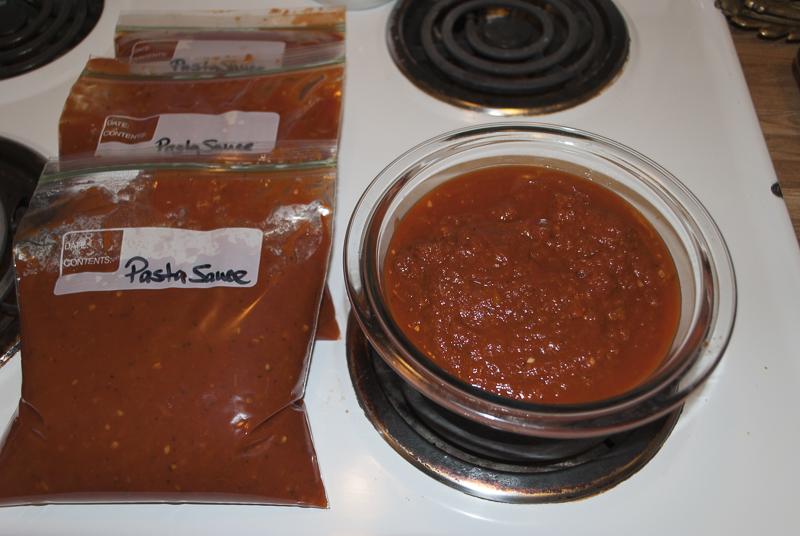
This recipe is perfect to make in a large batch that can be portioned and frozen for future dinners. With an afternoon of minimal prep work, and a little planning, I have four 24 oz portions of red sauce (equivalent to four jars of prepared spaghetti sauce).
 If you live with a picky eater, or if you are interested in upping your nutritional ante, there are a few surprising ways you can “sneak” vegetables into your meals. This versatile red sauce is one of my favorite recipes to hide veggies in, the flavors all complement one another really well.
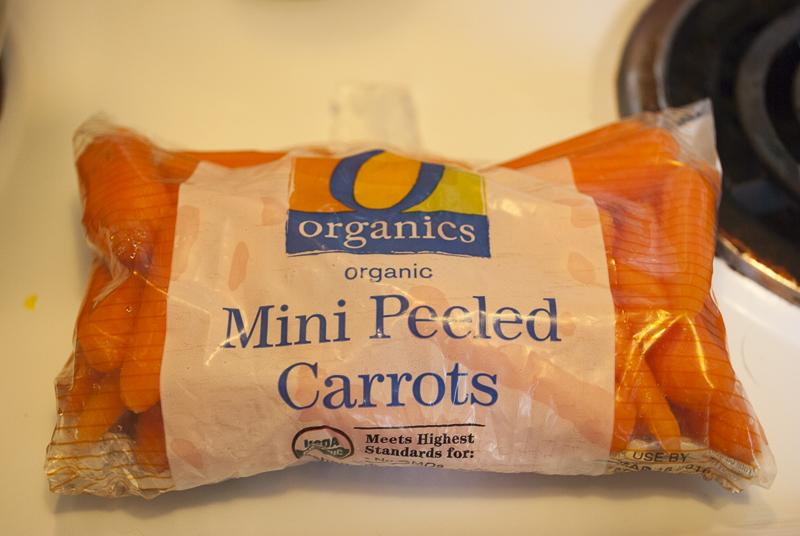
In lieu of sugar, this recipe contains a delicious secret ingredient: carrots. With the food processor, making a carrot puree takes a matter of seconds–don’t fret, you can do it. If you think carrots in spaghetti sounds off-putting or strange, trust me! The carrot puree is a subtle addition to the sauce, adding a thicker consistency and a deeper flavor profile.
Versatile Red Sauce
INGREDIENTS: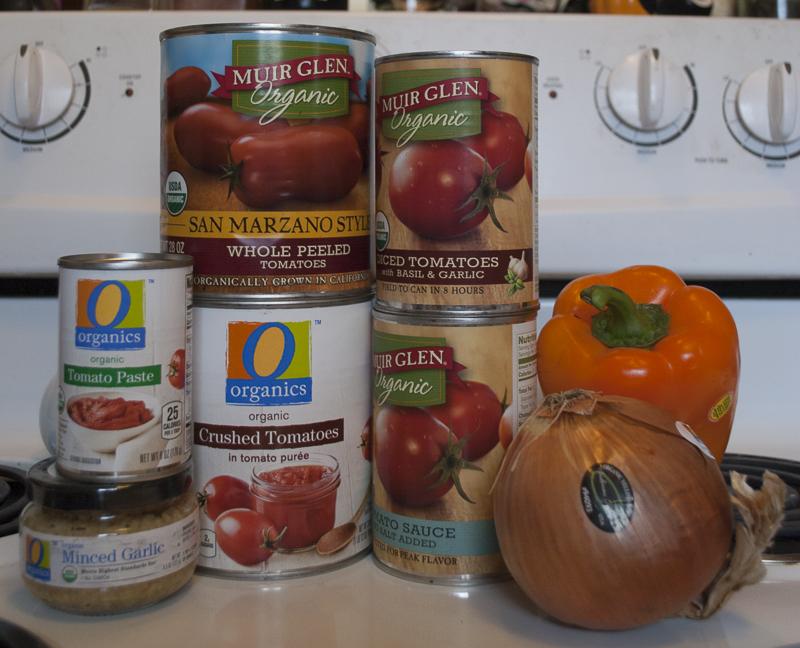
- 1 Whole Bell Pepper, diced (~ 1 C)
- 1 Large White Onion, diced (~ 1 C)
- 8 oz carrots, shredded or pureed
- oil for sautéed vegetables
- 28 oz San Marzano whole, peeled tomatoes
- 28 oz Crushed tomatoes in tomato puree
- 14.5 oz Diced tomatoes w/ basil and garlic
- 15 oz tomato sauce
- 6 oz Tomato paste
- 1/4 C Red Wine Vinegar
- 2 Tbsp Minced Garlic
- 2 Tbsp Italian Seasoning (more herbs/spices can always be added whenever you are preparing this sauce for dinner)
DIRECTIONS:
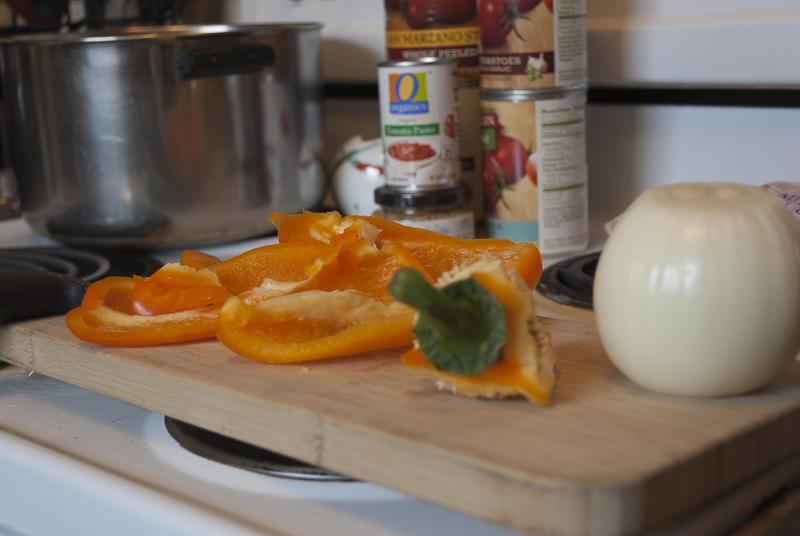
Step 1: Add 2-3 Tbsp oil to a tall pot with a heavy bottom & set to a medium heat.
Step 2: Dice onions and bell pepper, OR quickly chop them in the food processor, and add to the pot. Allow the pepper and onion mixture to cook until the onion is clear.
Step 3: Meanwhile: chop the carrots in the food processor, making sure to scrape the sides and pulse until the carrots are finely diced. Then, add 2 Tbsp water to the carrots and turn the food processor on for 1 minute, until the mixture is smooth. Set aside.
Step 4: Once the onions are clear, add all of the cans of tomatoes to the stockpot–including the tomato paste–and stir until evenly combined. Add the carrot puree and stir again.
Step 5: Allow the sauce to heat to a simmer, then turn it down to low and cook for two hours. If your pot is really full, a lid will minimize the mess from the bubbling red sauce.
Step 6: Add the garlic, seasonings and red wine vinegar. Stir the red sauce and allow to simmer for another two hours.
Step 7: Remove the sauce from heat, stir well and allow to cool.
Step 8: Using your preferred method for storage, portion the sauce into 24 oz bags if you want to have a conventional-equivalent to jarred red sauce.
Step 9: Freeze and enjoy! When you’re ready to eat it, defrost the sauce on a plate in the refrigerator and simply add it to your choice of protein and/or pasta!
![]()
Freezer Meal Party: What I Learned
29 Feb 2016
A week ago, I went to a freezer meal-planning party.
Making freezer meals ahead of time and in bulk is a great way to lighten up the evening workload. It is a practice that I’ve always been interested in, but assumed I lacked the technical know-how to successfully pull it off. So when I was invited to the meal-prep party, I was excited to learn a new skill to incorporate into my future dinner plans.
There are a few different companies that offer this type of service and the various programs could differ from the experience I had, but the premise is the same–make ahead meals that save time and money. By planning ahead, you can buy meats in larger quantities and take advantage of the bulk package pricing. All of the prep-work for a list of meals is done in one go, which has a double advantage: fewer dishes every evening and a lot of extra time on your hands.
After paying my party registration fee, I received the shopping list. This fee covered a number of items that would be used in the meals, namely oils and spice blends bearing the company’s logo. The shopping list was designed around a packet of recipes, which I would later receive at the party. Simple enough concept. The few drawbacks that I noted early on were easily passed off. Notably, without the recipe list, I was completely unable to modify it to suit my family’s tastes. Determined to capture the experience as intended, I stuck to the shopping list and went out to buy the meat and produce.
Before the party, I worked through the set of instructions provided by the company. Starting with the produce, I diced, sliced and chopped each ingredient, and carefully portioned them into each labeled bag. Then, I tackled the meats in the same fashion and loaded everything up for the party reminding myself that I was determined to see this through to the end.
Lugging my cooler back and forth between houses was tedious, in the future the overall workload will be decreased by at least that much. At the party, we all received a bag full of various ingredients that would complete our recipes, and a packet of cooking instructions with suggested side items to complete each meal and a few bonus recipes for those items. There was the customary sales-pitch to host your own in home meal-planning party, and the option to purchase additional cooking oils and spices at a discounted rate. I declined to purchase any further ingredients until I had a chance to try the meals I had already made with the products. I was later thankful for that decision because one of the seasoning blends in particular is too spicy for my daughter to enjoy. This has created a different sort of struggle at dinner time.
Which brings me to my conclusion: what have I learned?
In short, make ahead freezer meal planning is pretty nifty. I simply take a bag out to defrost in the refrigerator while I am in school and, in the evening, pop it into the oven for 30 minutes or so while I attend to other household duties. With a small amount of effort, a salad and a simple rice or pasta dish completes our meal.
In the future I would prefer to create my own meal-plan that better suits my family’s tastes. Some of the new recipes were a success–even with my little picky eater–and I am inspired to add more variety to my usual dinner choices. With some careful work and planning (and the help of a few cookbooks), I plan to apply the same methodology to a new meal plan that primarily uses the slow cooker and pre made casseroles that can be defrosted and baked in the oven. Ideally, this will further cut down on the amount of dirty dishes–and overall time spent–in the kitchen.
All-in-all, the experience was a good one. I learned a new skill, added a few new recipes to my arsenal, and got to try some new oils and spices that I never would have thought to create. I have already saved myself a considerable amount of time thinking about what to serve for dinner, the prep work and dishes associated with crafting those meals. I won’t be paying to attend another meal-prep party any time soon, but I look forward to recreating the experience in my own home.
![]()
Make Your Own: Delicious Cream of Mushroom Soup
22 Feb 2016
I struggle with food.
More accurately: I struggle with the definition of “healthy food,” and applying that definition to my daily life.
Without diving into the debate of GMO versus non-GMO, conventional versus organic–my primary goal, when feeding my family, is using ingredients that my nine year old can pronounce–food my great-grandmother might recognize.
Healthy and wholesome are operative terms that we can debate to define in a number of ways. Personally, I prefer not to operate on extremes of any fashion. So without cutting out carbs, nixing processed foods, or adopting the diet of our Paleolithic ancestors, I have been trying to replace common household staple items with ingredients I feel positive about mixing into my dinner. This way, without fasting from sugar or depriving my family from the experience of eating potato chips, I can feel confident that our meal plan is as wholesome as i can manage.
Wholesome and healthy aside, I am also a sucker for comfort food. Casseroles with pasta and cheese are at the top of my family’s favorite dinners.
Which brings us to my nemesis: cream of science condensed soup. That shiny, gelatinous goo in a can has crept its way into an overwhelming amount of conventional recipes. One could almost believe that it is impossible to make a fantastic-tasting meal without opening a can of that odd-smelling stuff. When I embarked on my food-journey, slowly replacing questionable ingredients on my shopping list, I was loathe to continue purchasing those cans of condensed soup.
After a bit of research I learned that the original condensed cream of mushroom soup was little more than a roux ( flour + butter), broth, milk and mushrooms. Easy enough.
The most essential part of this recipe is making a good roux. I know, “roux” sounds fancy and difficult–but, I promise, it’s easy. Just grab a whisk and dedicate five uninterrupted minutes to the task.

Delicious Cream of Mushroom Soup
INGREDIENTS:
- 1 C. butter
- 1 C. flour
- 1 box mushrooms, finely chopped
- 1 C. onion, finely diced
- 2 C. vegetable broth
- 2 C. milk
DIRECTIONS:
Step 1: In a large saucepan: melt the butter over medium heat. Slowly add the flour and whisk to thoroughly incorporate, then add more flour and whisk again.
Step 2: Whisk in half the milk and mix the milk with the roux completely, creating a cream sauce. Then, stir in the rest of the milk and vegetable stock. Bring to a simmer and then turn down to a low temperature.
Step 3: Meanwhile, in a medium sized pan: saute the mushrooms and onions over a high heat until tender. When the onions are clear and caramelized, add the mushroom and onion mixture to the cream sauce.
Step 4: Continue to cook for 20-30 minutes, until the soup condenses and begins to thicken. Then, turn off the heat and allow the soup to cool in the pot.
Step 5: Set out your freezer-safe containers. This recipe makes five-8 oz servings or four-10 oz servings. Allow the soup to cool completely in the containers before putting into the freezer. This recipe will keep in the freezer for a few weeks. Just let it thaw out in the refrigerator the day before you need to use it–or, on the counter for an hour or two if you’re in a pinch.
Depending on your choice of produce and milk, you can actually make four servings of the same canned cream of mushroom soup for a fraction of the cost. For those of you who prefer to eat organic and GMO-free, this is a relatively simple way to recreate a modern staple item on your terms. With a little tweaking, this could easily be turned into a cream of chicken or cream of broccoli recipe.
I hope you enjoy this recipe as much as my family does.
![]()
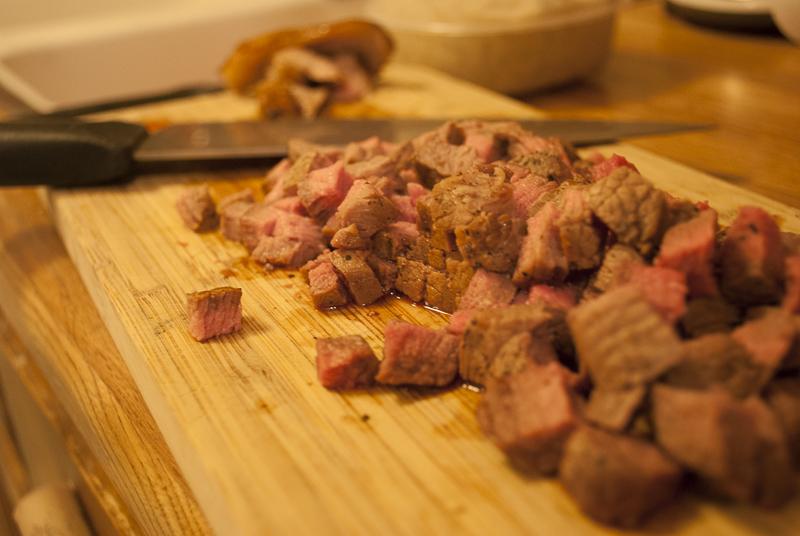
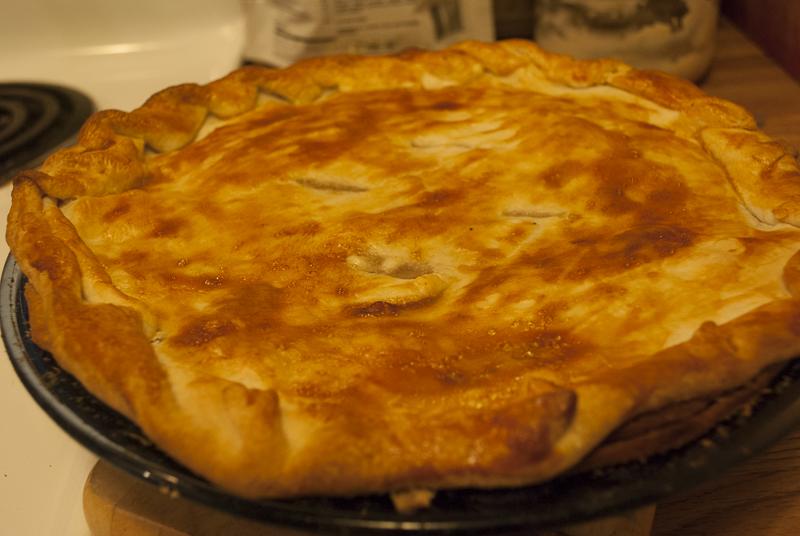
Family Favorite: Savory Pot Pie
15 Feb 2016
I like cooking pot pies. There is something indulgent about eating a savory pie for dinner. For all its fantastic deliciousness, making a pot pie is surprisingly simple. It is one of the most versatile and forgiving recipes in my arsenal–and it can be adapted to include leftovers! Bonus!
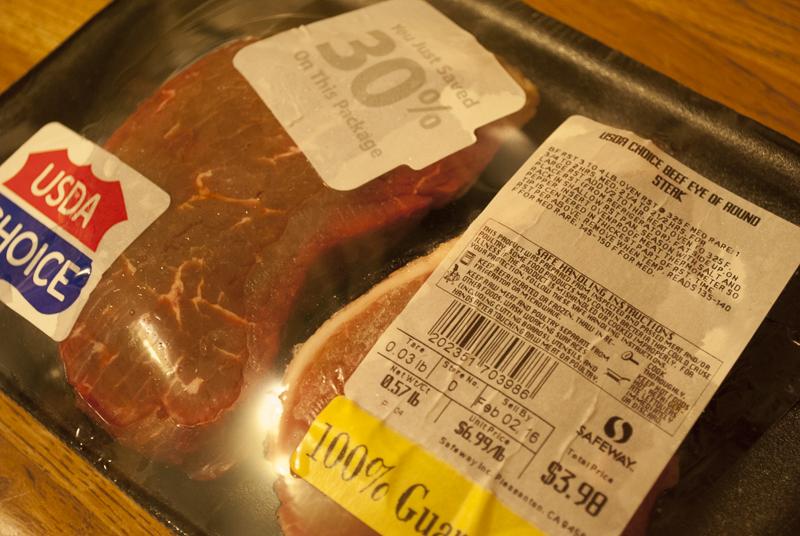
My budget-friendly savory pie recipe can be adapted to suit your tastes–or whatever meat you happen to have handy. I have made variations of this recipe with chicken, turkey and ham. This week, I used steak as my meat base. Why steak? Because I scored the tiniest package of steak on sale one morning and needed to turn it into dinner.
Savory Steak Pot Pie
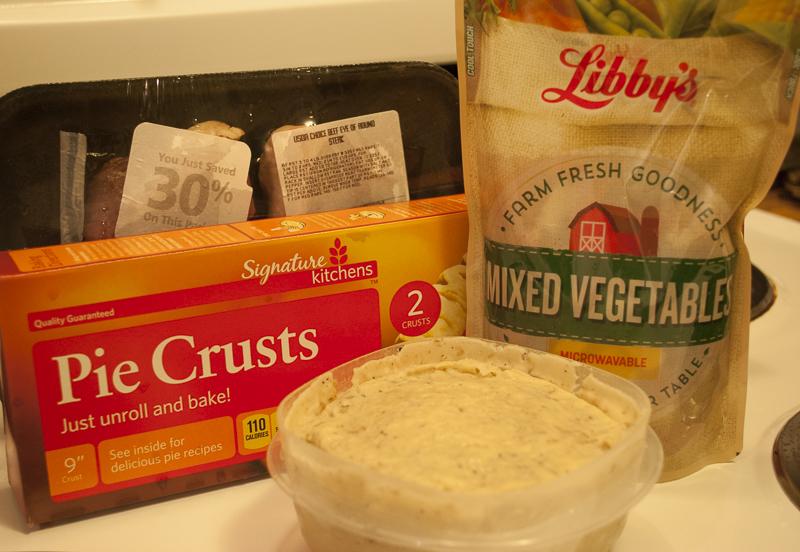
INGREDIENTS:
- Cooked steak, trimmed of fat & diced
- Refrigerated pie crusts, 2 pack
- Mixed vegetables, drained
- Cream of mushroom soup
(I make my own recipe, this is the equivalent of 1 can of condensed cream of mushroom soup) - 1 egg white
DIRECTIONS:
Step 1: Preheat oven according to package instructions
Step 2: In a large bowl, combine steak, cream of mushroom soup and mixed vegetables. Add garlic powder, salt and pepper to taste. Mix well and set aside.
Step 3: Unroll one pie crust from the packaging and press into a glass pie plate. Trim the excess crust away.
Step 4: Add the pie filling and bake in the oven for 10-15 minutes, until the crust begins to brown and the filling is heated.
Step 5: Carefully remove the pot pie from the oven and place the second, unwrapped, pie crust–CAREFULLY–on top of the pot pie.
Step 6: Fold up and pinch the excess crust around the edges of the pie, then cut a few slits in the middle to vent steam.
Step 7: Using a pastry brush, liberally coat the pie crust with the egg white–paying extra attention to the crevices in the crust.
Step 8: Carefully–and I cannot stress this enough–CAREFULLY put the pot pie back into the oven. Remember, it is still hot from baking the first time. Allow to bake for another 10-15 minutes until the crust is flaky and golden brown.
Step 9: Remove from oven and allow to cool and thicken up for a few minutes before serving.