


My Old House: Bringing home a reminder of the Appalachians here in the shadow of the Rockies
![]()
ACC student Carolyn Jarvis is rehabbing her Grandma’s Denver bungalow one project at a time. Here is her latest report, “The Rocky Mountains Meet the Appalachian Mountains.”
When I was a kid, my parents moved us to the Virginia suburbs of the nation’s capital.
The city we lived in was over-populated, so on weekends and spring breaks, we’d take vacations to the Appalachian Mountains, much like you would do here with the Rocky Mountains.
The only difference, besides the elevations, was the Appalachians’ misty rolling mountains. Like John Denver, I enjoy both mountain ranges’ beauty.
Since I can see the Rocky Mountains anytime I want just by looking out the window, I decided to bring the Appalachians to me by painting them on my pantry door. You could follow these tips and paint this view on any surface.
MATERIALS
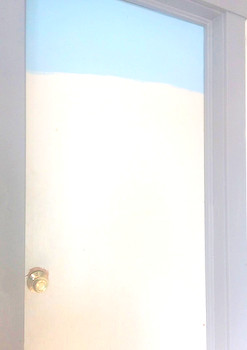
First, paint your sky
• Pencil
• Paint
• Paintbrushes
• Paint holders
STEPS
1. With a pencil, lightly draw your mountain ridges onto your surface. Don’t worry about making mistakes, this is just an outline that you will paint over later.
2. Mix increasing amounts of white with the base color to create a gradient, one color for each traced area on your surface.
3. Paint your “sky” first in the lightest color and continue down, painting each mountain ridge with a darker color as you go. Your bottom ridge should be the base color alone, no white mixed in.
4. Once all ridges are painted, go back and touch up each color as needed.
Welcome to the Appalachians!
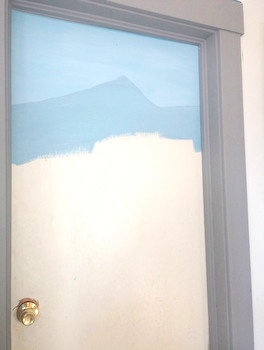
Paint your first ridge, and continue this way until you’re finished!
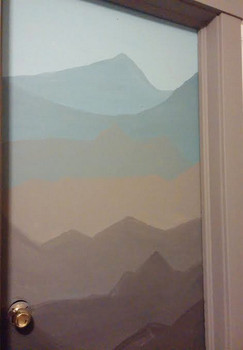
All done! Enjoy your view of the Appalachian Mountains from the front range of the Rockies.

Carolyn Jarvis is a sophomore majoring in Journalism. Her biggest goal is to transfer to Metro State in the summer and finish up her bachelor's in the same field.
In her free time, she enjoys many hobbies like writing, digital photography,...