
My Old House: Carolyn Jarvis’ odyssey though her 1924 Denver bungalow
![]()
After my grandmother passed away, my family and I bought her 1924 bungalow in south Denver. She loved that old house, and so do I.
It means a lot to my family, and we just couldn’t stand the idea of it being knocked down and turned into another ticky-tacky new development.
Nor did we like the idea of it staying in the same condition that it was, after years of renters living there.
After all, this was the house that my father lived in, and where he was living when he met my mother.
As time wore on, we moved around the country and lived in many homes.
But Grandma’s house in Denver always was the constant. In later years, though, renters just didn’t love it the way we did, and it showed.
My goal now is to let our love shine through by refinishing my home, and I’d love to show you every step of the way through a series of features called My Old House.
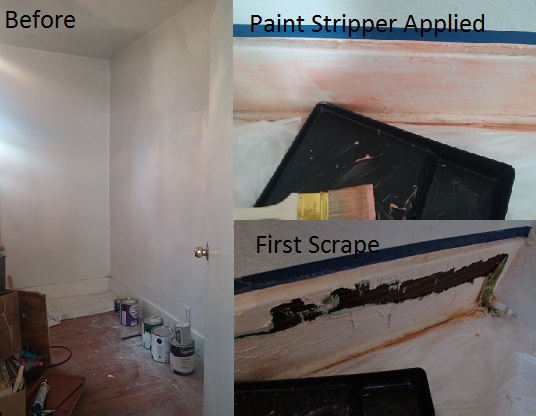
Today, I am going to show you how to strip and refinish your painted hardwood. I am focusing on the baseboards and window frame / trim in the bedroom today. They are original to the house and covered in layers and layers of paint.
Here we go:
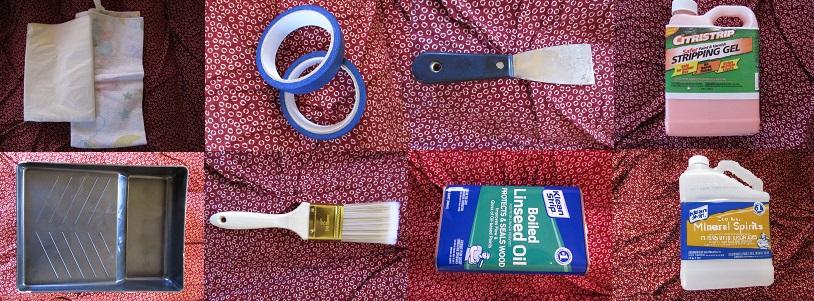
- Set up supplies. You will need:
- Paint stripper (I am using Citrustrip)
- Mineral spirits (I am using an “odorless” one, but it still stinks)
- Boiled linseed oil
- Plastic bowl or roller tray
- Water
- Drop cloth (I am using a plastic one plus old blankets)
- Rags
- Rubber gloves
- Goggles
- Mouse sander
- 150 grit mouse sander refill
- Paint brush
- Putty knife (plastic helps avoid scratching the wood)
- Dust mask
- Make sure you’re working in a well-ventilated area, opening as many windows and doors as you can. The brand of stripper I am using, Citristrip, is less dangerous and has a somewhat pleasant orange smell. However, it still is important that you put on a mask because the fumes from the paint stripper can be harmful. Put on rubber gloves and goggles
- Pour paint thinner into your plastic container, then brush it onto the surface of your item with a disposable paintbrush. The gel that I am using allows much wait time so you can cover a large surface at one time without the fear of drying.After your stripper is applied, try not to mess with it. If you mess with it, you will break down the wax barrier that prevents the chemicals from drying. Remember to follow the directions on the container. Citristrip enables you to let the product sit for up to 24 hours. I let it sit for about 6 hours, because I found that it doesn’t stay wet as long as it says it does – at least here in Denver’s dry climate
- Eventually, the paint will begin to bubble. You will want to test a small area with your putty knife (I used a metal one but recommend a plastic one to prevent scratching). You should be able to scrape the layer of paint off effortlessly, seeing the grain of the wood. If not, let the stripper stay on longer. Throw the layers of paint into a covered trash can and remove them from your home when you are finished.
- You can reapply your stripper in areas that still have paint, if you need to, re-following earlier steps. Otherwise, dip your rag in mineral spirits and slowly wipe down your wood while remembering to wear your safety items. This should remove the remainder of the paint. Use a toothpick to remove hard-to-reach paint. Apply a small amount of water to a paper towel or rag, and wipe down your wood. This will prevent your chemicals from developing further. Also, this is a great time to make sure your workspace is tidy. CAUTION! Always throw your used rags away! Do not store them for future use because they are very flammable!
- Sand down your wood the best you can. It’s always best to sand with the grain of the wood, using whatever grit of sandpaper you like. This preps the wood for staining. I am using a natural oil, boiled linseed, because I like the stain the wood already has, and the oil will enhance it. However, if you are looking to use a stain with a color, I recommend a gel stain as they are similar to the natural oil but with great color payoff. Put your oil into a clean plastic container and apply liberally with a brush. Go with the grain of the wood to help ensure full coverage and assist penetration. Leave it on for a half hour, then wipe down the surface with a dry cloth.
- Clean up.
Done!
Tune in next week to see what projects are in store for My Old House!

Carolyn Jarvis is a sophomore majoring in Journalism. Her biggest goal is to transfer to Metro State in the summer and finish up her bachelor's in the same field.
In her free time, she enjoys many hobbies like writing, digital photography,...